Monday, September 26, 2011

Recipe: Summer Leftovers Quick Breads

Right now at the farmers market you’ll find a lot of what I like to call “summer leftovers.” These are vegetables that bloom and are technically in season in the summer but, if stored in a cool dry place, will last until the fall. This includes zucchinis, summer squash, egg plant, and even cucumbers and some peppers. The good news is that, since these last outside the fridge for so long, a lot of the farmers stockpile them to have something to sell between seasons. The bad news is that you’ve probably been eating the same vegetables for a couple months and are ready for a change.

To that end, NPR published an excellent collection of quick bread recipes, proposing them as “solutions to summer’s bounty”. All the recipes are incredibly easy to make and, even better, freeze well to eat later. They are called quick breads because they don’t use yeast, just the natural sugars in the vegetables along with some basic ingredients everyone has lying around their house.

This is the recipe I used with some green and yellow zucchini I got from Houston Farms. The eggs are, as always, from Windy Hill Farm and I topped off the finished product with butter from Simply Local.

Zucchini Quick Bread (v, LPO)
3 1/2 cups all-purpose flour, plus extra for dusting
2 teaspoons baking powder
1/2 teaspoon baking soda
1 teaspoon salt
1 teaspoon ground cinnamon
1/2 teaspoon freshly grated nutmeg
1/4 teaspoon ground cloves
2 1/4 cups coarsely grated, unpeeled zucchini
1 cup sugar
4 large eggs, lightly beaten
1/2 cup vegetable oil

  1. Preheat the oven to 350 degrees. Grease and flour two 8 1/2-inch loaf pans.
  2. Sift the flour, baking powder, baking soda, salt, cinnamon, nutmeg and cloves into a bowl, and set aside.
  3. Combine the zucchini, sugar, eggs, and oil in a large bowl, and mix by hand until evenly blended.
  4. Add the sifted dry ingredients to the zucchini mixture. Stir by hand just until the batter is evenly moistened and blended.
  5. Divide the batter between the prepared loaf pans and bake until edges are brown and pull away from the pan, about 50 minutes.

Monday, September 19, 2011

Recipe: Pesto Pasta with Chicken

Like most athletes, I LOVE carbohydrates. Bread, cereal, you name it, I love it. Remember a couple years ago when the Atkins diet was all the rage? There’s no way I could have stuck to that, I just love carbs too much. However, I do try to be smart about what carbs I eat, sticking as much as possible to whole grains and minimal additives. Now, thanks to the places like the Atherton Market, Nova’s Bakery and Common Market, you can purchase local whole grain breads and pastas that are low in preservatives and other unnecessary ingredients.

I love pasta but it is not a meal by itself; you have to add a sauce or accompaniment that accents the pasta and adds flavor as well. I’ve posted in the past about my really simple tomato sauce but there are, of course, other options. Below is my pesto recipe that I make using a tiny Cuisinart food processor. Like a lot of what I make, pesto is easily frozen and brought back to life later when basil is no longer in season.

A note on basil: this herb baffles me in the super market. Ask anyone with a garden and they’ll tell you that basil is like a weed: cut some of it back and it will return three times as thick. This time of year, my friends with basil plants are literally forcing it on me. Even better, I hear you don’t have to plant it each year, it just comes back (I don’t say this from experience since, as avid readers know, I fail at anything related to growing plants). The moral of the story is that you can usually get basil for free from friends or cheap from a farmers market and it will be higher quality that anything you buy from the grocery store. The basil below was straight from my sister’s garden in Chapel Hill and was a combination of common basil and lemon basil. The chicken I got from Windy Hill months ago and the garlic is from Houston Farms.

Pesto Pasta with Chicken (LPO)
4 cups basil (leaves only)
½ cup Parmesan
2-3 cloves garlic
2 tablespoons pine nuts or slivered almonds
3 + 2 tablespoons olive oil
Salt and pepper to taste
2 large chicken breasts

Pesto sauce:

  1. Put nuts and garlic in food processor and pulse a couple times till somewhat chopped
  2. Add basil and pulse until the leaves are reduced
  3. Add Parmesan, salt and 3 tablespoons olive oil and pulse until a paste is made

Dish:

  1. Slice chicken breasts width-wise
  2. Heat olive oil on medium-high then add chicken slices (add salt and pepper as you like)
  3. Saute until cooked through
  4. Boil pasta till at desired tenderness
  5. Drain pasta but save ½ cup of the pasta water
  6. In a medium/large bowl, combine the pesto, cooked chicken and pasta with pasta water (this helps break up the pesto and makes it stick to the pasta)
  7. Enjoy hot with more Parmesan!

I served my pesto with a cucumber-tomato-garbonzo bean salad.

Monday, September 12, 2011

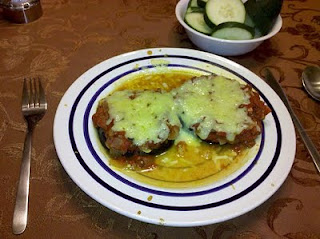
Recipe: Eggplant Parmesan

Eggplant is one of those vegetables I have a really hard time getting excited about.  Sure, it’s a pretty color on the outside but the inside ranges from pea green to blah white and it has weird seeds that are kind of slimy. I’m not selling this very well, am I… the reality is that eggplant is not, by itself, very exciting.  However, if you are you one of millions of Americans that are going carb-free or are at least avoiding pastas and other processed carbs for health reasons, eggplant can be your best friend.

Luckily, eggplants grow really well in North Carolina and most markets right now have the common oblong eggplant but you can also get dwarf (small round), snake (long and skinny) or the slightly rarer white varieties as well.  I buy mine from Houston Farms at the Atherton Market and each one I’ve gotten from them has been excellent. 

Since this great vegetable is in season right now, I have been trying to use it in place of heavy carbs for dinner. Below is one example you can make instead of chicken parmesan or lasagna, but you can also cube eggplant and sauté it like potatoes and cover it with alfredo, marinara or olive oil-based for a health alternative. I thawed some tomato sauce I already had from this recipe but you can use store-bought.  Finally, I used pepper jack cheese from Simply Local but you can use any variety you like (I’d suggest mozzarella or a plain jack cheese).

Eggplant Parmesan (v, LPO)
1 medium to large eggplant, sliced in ½ inch horizontal layers
1 ½ cups tomato sauce
1 cup shredded Pepper Jack cheese
Salt and pepper to taste
1-2 tablespoons olive oil for the pan
  1. Using large skillet or frying pan, heat oil over medium-high heat and lay eggplant slices in pan
  2. Simmer covered for 10 minutes, flipping once, or until brown on both sides
  3. Remove slices and place on oven-safe plates
  4. Cover with tomato sauce, sprinkle with cheese 
  5. Heat in oven at 300 degrees for 10 minutes or until cheese is melted

I served my eggplant parm with chilled cucumbers - delicious!

Tuesday, September 6, 2011

Heather Kenney from Houston, TX


My boyfriend was kind of confused when I told him that I was nervous about writing a guest post for Sarah's blog. And his confusion was warranted: I'm not sure I know anyone who obsesses about all things eating-related as much as I do. I scour restaurant reviews before trying someplace new, and one of my proudest moments was when I learned how to break down a whole chicken. Even further, I insist on making pumpkin pie using an actual pumpkin and I make my own peanut butter. I have a meal-planning spreadsheet, for heaven's sake! So, yes: I am obsessed with eating and eating well, at that. The problem is that I'm not exactly concerned with eating local (um, don't tell Sarah).

"But we do eat local: we do all our food shopping and eating out in Houston," was my boyfriend's response to my anxiety attacks.

At first, I just laughed and dismissed his smart-ass comment. But then, I started thinking that there was some truth behind his statement: eating locally doesn't necessarily mean shopping at farmers' markets and co-ops or joining a CSA (although those are certainly great options). The real spirit of eating local is to take advantage of the ingredients that are available in your area, and you can do that right from your grocery store shelves.

I lived in the Northeast for 26 years and took it for granted that all grocery stores are the same: meat section, bakery section, canned goods, dried goods, and produce. Heck, with the way our food travels now, even produce sections look pretty much the same. But last year I moved to Houston, Texas, and my mind was blown when I discovered that they actually have different produce here. Specifically: they have okra. If you've lived in the south, you probably wouldn't understand, but to a northern girl like me okra is something magical and rare. I don't think I had actually seen an actual fresh, okra pod before in my life. In elementary school, I kept a dried okra pod on my desk because I thought it was so crazy and unusual. Actual edible okra was only sometimes found on barbecue-themed menus, and then it was only available chopped and fried. But in Texas, there are mountains of fresh okra in the produce aisle. And it's crazy cheap, too, because it's grown nearby. And I am seriously in love with it.

A lot of people have a problem with okra because it has a reputation for being slimy. Although this slime is central to many a New Orleans dish (gumbo, anyone?), I can appreciate that, in general, slime may not be the most appealing characteristic in a food. To those people who avoid okra, I would beg you to reconsider. If you toss it whole on a baking sheet, drizzle it with olive oil, sprinkle it with salt and pepper, and roast it at a really high temperature, you will be too busy burning your mouth on the resulting product to remember the slime...or much else. In fact, now that I think about it, I have been too busy eating roasted okra straight off of the baking sheet--and maybe burning my mouth--to notice that I happened to be eating local, too.

Roasted Okra
1 lb okra
Olive oil
Salt and pepper

  1. Drizzle the okra with olive oil and then season with salt and pepper to taste. 
  2. Roast in a 425 degree oven for 15 to 20 minutes, or until okra is lightly browned and crispy looking.

Roasted Okra Salad
I discovered that my roasted local okra becomes even more delicious when combined with a handful of other local ingredients. Just toss all the ingredients together in a large bowl and serve. This salad is delicious both warm and cold, and it makes a great side to heavier Texas-beloved entrees like barbecue or chicken fried steak. (But I won't tell anyone if you just eat it straight from the bowl.)

Roasted okra (see above)
1/2 - 3/4 cup chopped cilantro (another Texas discovery!)
1/2 cup diced red onion
1 cooked ear of corn (roasted or boiled: your call)
1/2 cup of your favorite salsa
Salt to taste